Prerequisites
Hosting your own version of STACKrate
While you can certainly use the JavaScript module hosted on our infrastructure (see Step 2 in Quickstart), we recommend that you host STACKrate on your own infrastructure. This way you can ensure that STACKrate remains available at a URL of your choice.
To do this, you will need to copy at least the following files into a folder (we recommend the name stackrate) on your webspace:
.
├── LICENSES
│   └── GPL-3.0-or-later.txt
├── stars.css
├── stars.js
└── translations
    ├── de.json
    ├── de.json.license
    ├── es.json
    ├── es.json.license
    ├── fr.json
    ├── fr.json.license
    ├── nl.json
    ├── nl.json.license
    ├── pt.json
    └── pt.json.license
You can also copy the whole package into your folder.
Note: If you load the script from a site other than
the one on which it is hosted, also make sure you set the
Access-Control-Allow-Origin response header for the JSON
files in translations, as our script fetches them dynamically. This is
due to the CORS
protocol. If you host the script using the Apache HTTP server, you could
achieve this by placing an .htaccess file with the following
content in your stackrate folder (replace example.org
with the domain of your site):
<FilesMatch "\.(json)$">
  <IfModule mod_headers.c>
    Header set Access-Control-Allow-Origin "example.org"
  </IfModule>
</FilesMatch>
Working with HTML in the Moodle text editor
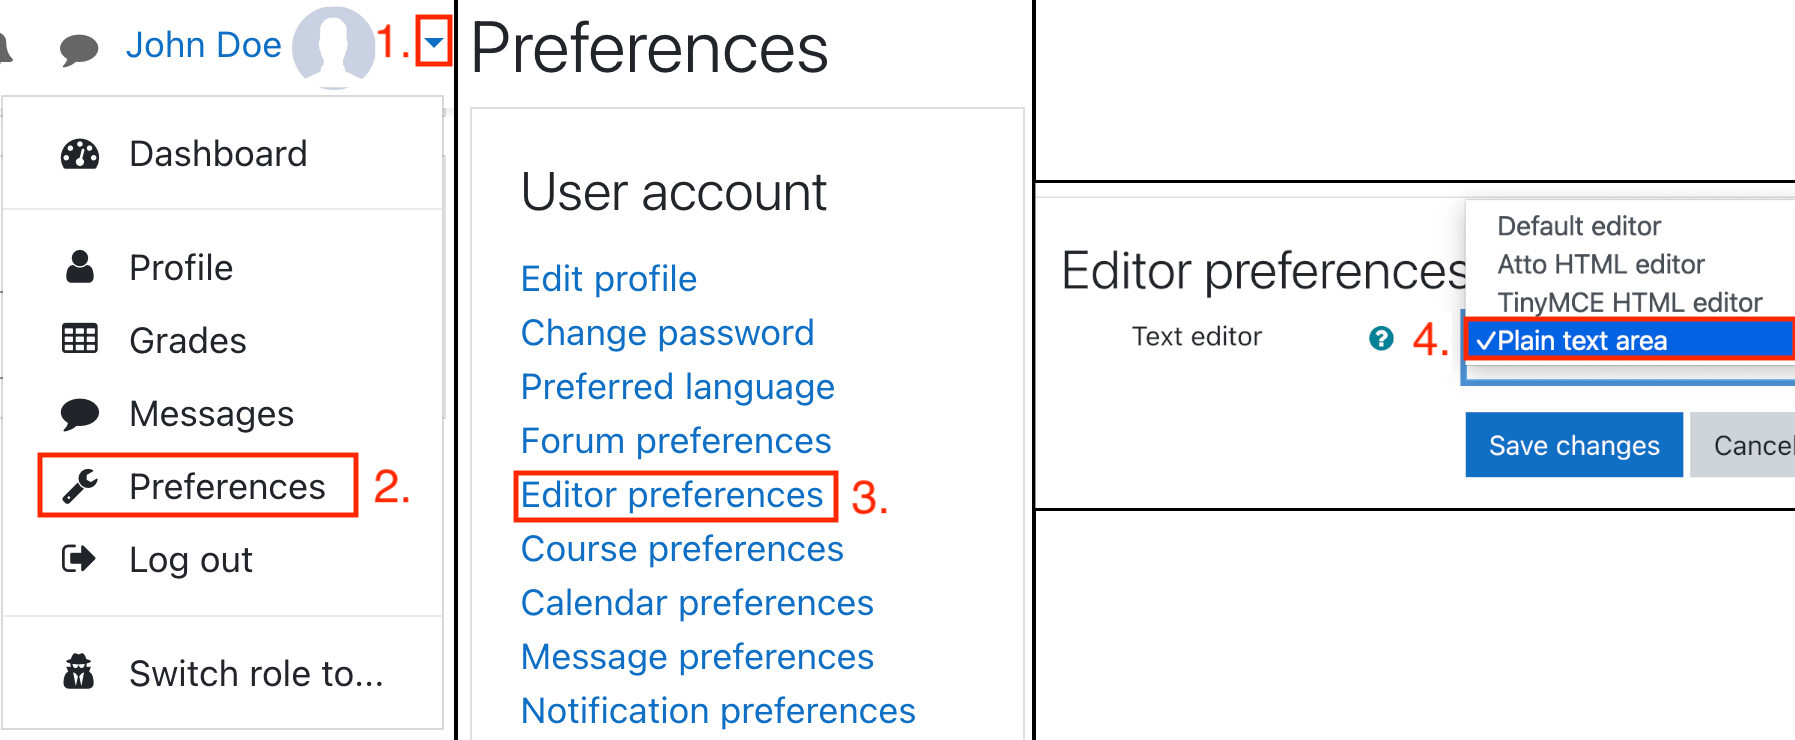
We recommend that you use the Moodle “plain text area” text editor for this. It can be activated by clicking on the arrow next to the user image in the top right corner of the main page and then clicking on “Preferences”. Then you can click on “Editor preferences” under “User account”. Here select “Plain text area” from the drop-down list.
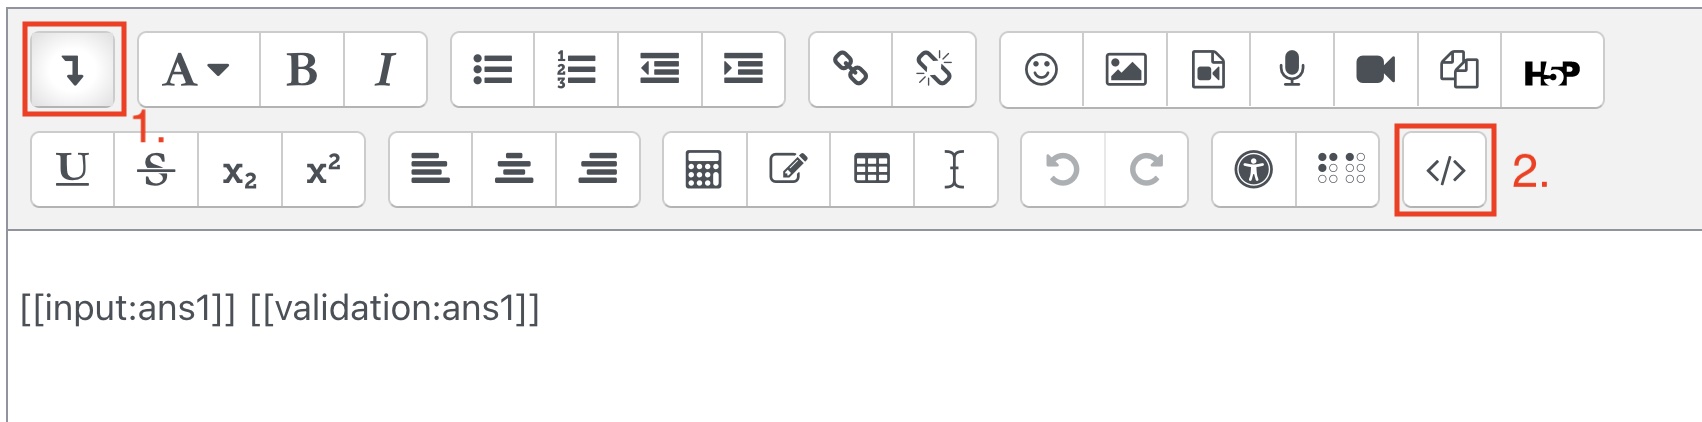
If you prefer to use the default Moodle text editor, which is usually
the “Atto Editor”, click on the arrow located on the left side of the
editor. The editor toolbar will now show more icons. Select the
</> icon, which will switch to the HTML source
view.
The JavaScript module and the hidden input field
To use the star rating, it is necessary to insert the following HTML fragment at the end of the question text of the STACK question:
<p class="ratingResults">[[input:ans_survey]] [[validation:ans_survey]]</p>
<script
    src="https://www.ruhr-uni-bochum.de/stackrate-maths/stackrate@0.2/stars.js">
</script>
The first line contains a placeholder for a hidden input field. The
rating results will be written to this hidden input field and stored
together with the students’ other responses within the Moodle database.
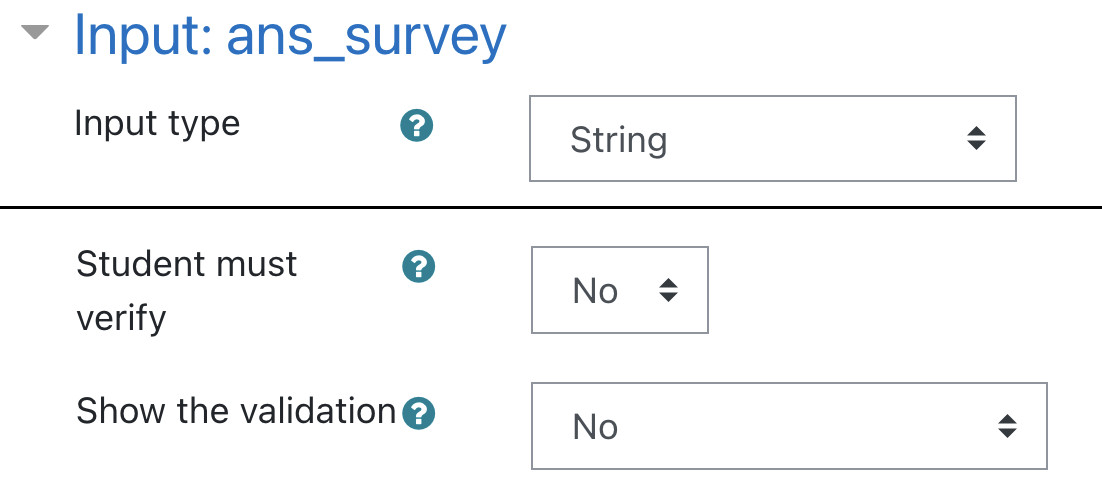
Note that using the name ans_survey means that no variable
with this name can be used within the STACK task. It is necessary to set
the input type of this hidden input field to string and disable
validation. It is also recommended to use the extra option
hideanswer which will prevent the “teacher’s answer” from
being displayed after the students have completed the task.
Note that the above script element sources STACKrate
version 0.2. The older version 0.1 of the package is still available
under
https://www.ruhr-uni-bochum.de/stackrate-maths/stackrate@0.1/stars.js.
Recommended settings for the Moodle quiz
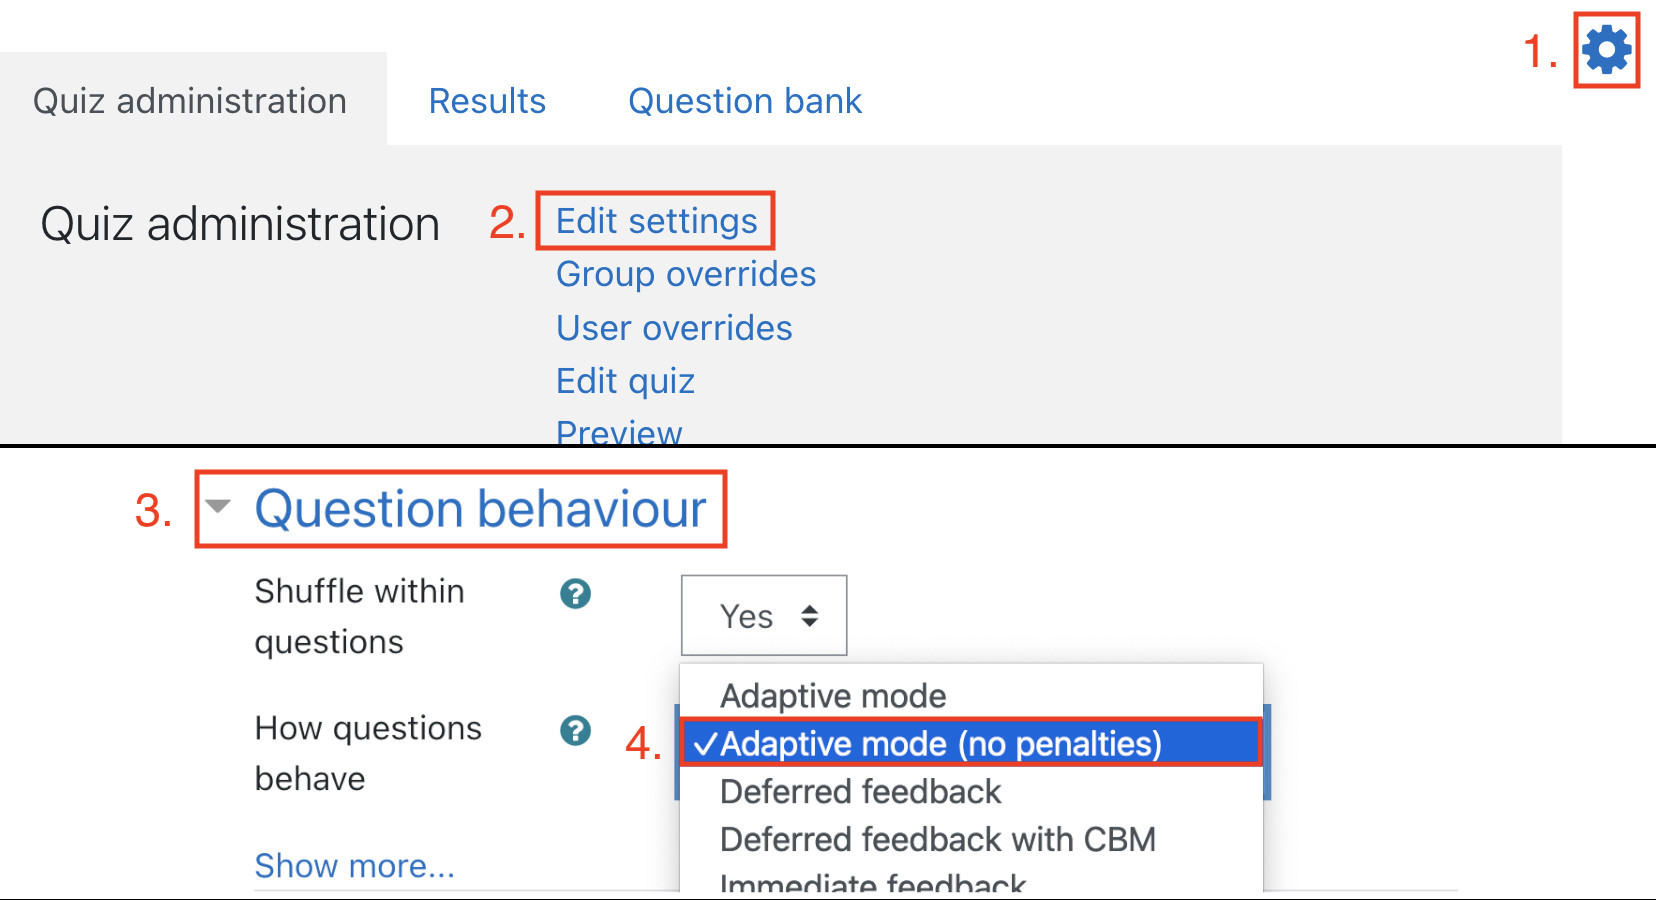
If the “Adaptive mode” question behaviour is enabled in the settings of the quiz, the star rating can be placed in the feedback of a potential response tree and will not be visible until the students have answered the STACK question. If the “Deferred feedback” or “Immediate feedback” question behaviour is selected, the star ratings will need to be placed within the question text and are visible to students as they work on the task. We therefore recommend that you the “Adaptive mode” question behaviour.
If you are using the “Immediate feedback” question behaviour, you may
want to prevent the script from renaming the Moodle check button to
“Submit rating” which could be confusing for students as it also submits
their attempt. This can be done by setting the
data-moodle-integration attribute on the
div.stars-rating element to false like
this:
<div class="stars-rating" data-moodle-integration="false">
...
</div>
Customizing your star rating
To create a set of evaluation questions that can be answered by using stars, add the following code you want it to appear (question text or feedback text):
<div class="stars-rating" data-name="my_id">
    ...
</div>
To match the ratings stored in the Moodle database with the set of
evaluation questions to which they belong, choose a name and set the
data-name attribute accordingly. The name can consist of
lowercase letters, numbers or an underscore.
To add an evaluation question, insert the following code between
these <div> tags:
<div class="question">
    – Insert your question here –
    <div class="stars"></div>
</div>
Instead of the placeholder – Insert your question here –,
add your own evaluation question. It is recommended to start with an
instruction like “Please answer the following questions:”, which can be
inserted between two <p> tags.
Overall, the completed star rating could look like this:
<div class="stars-rating" data-name="my_id">
    <p>Please answer the following questions:</p>
    <div class="question">
        How helpful was this feedback?
        <div class="stars"></div>
    </div>
    <div class="question">
        How helpful was the hint?
        <div class="stars"></div>
    </div>
    <div class="question">
        How would you rate the task overall?
        <div class="stars"></div>
    </div>
</div>
This is how the rating could look like on the Moodle page: 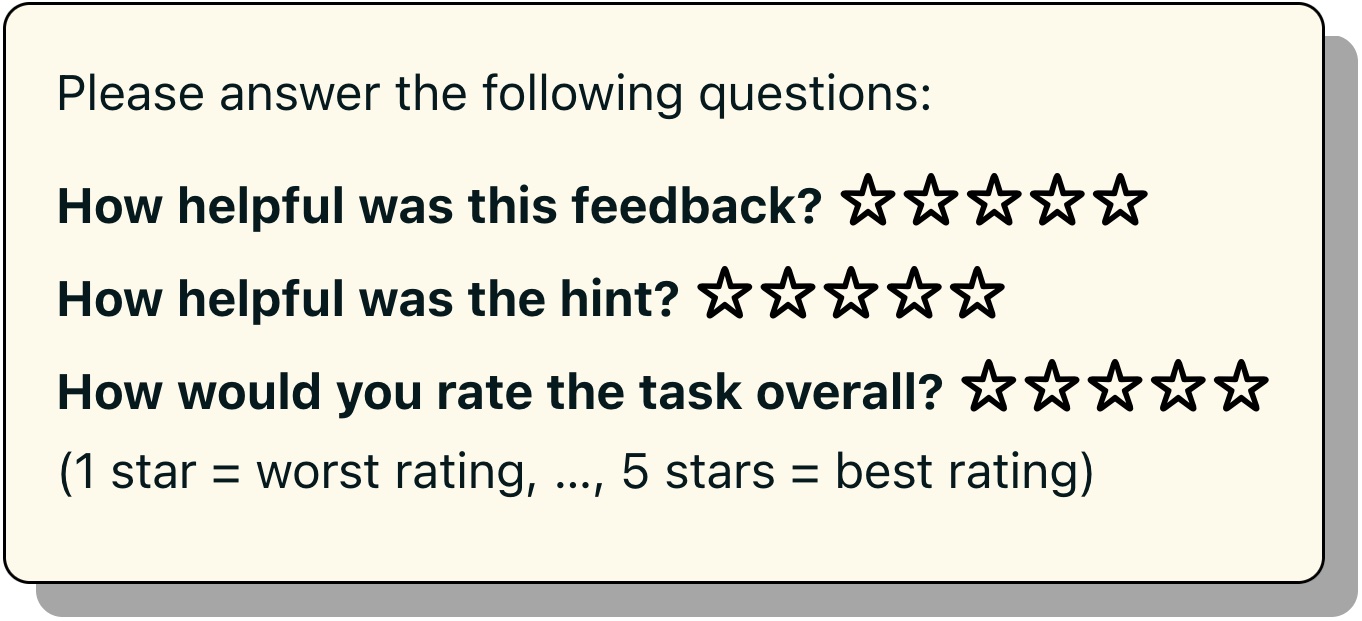
Add a text area for comments
If you want your students to explain their rating in more details,
you could add a text area for comments. Add the class
with-comment to the <div> with the class
stars-rating like so:
<div class="stars-rating with-comment" data-name="my_id">
    ...
</div>
This is how the rating could look like on the Moodle page: 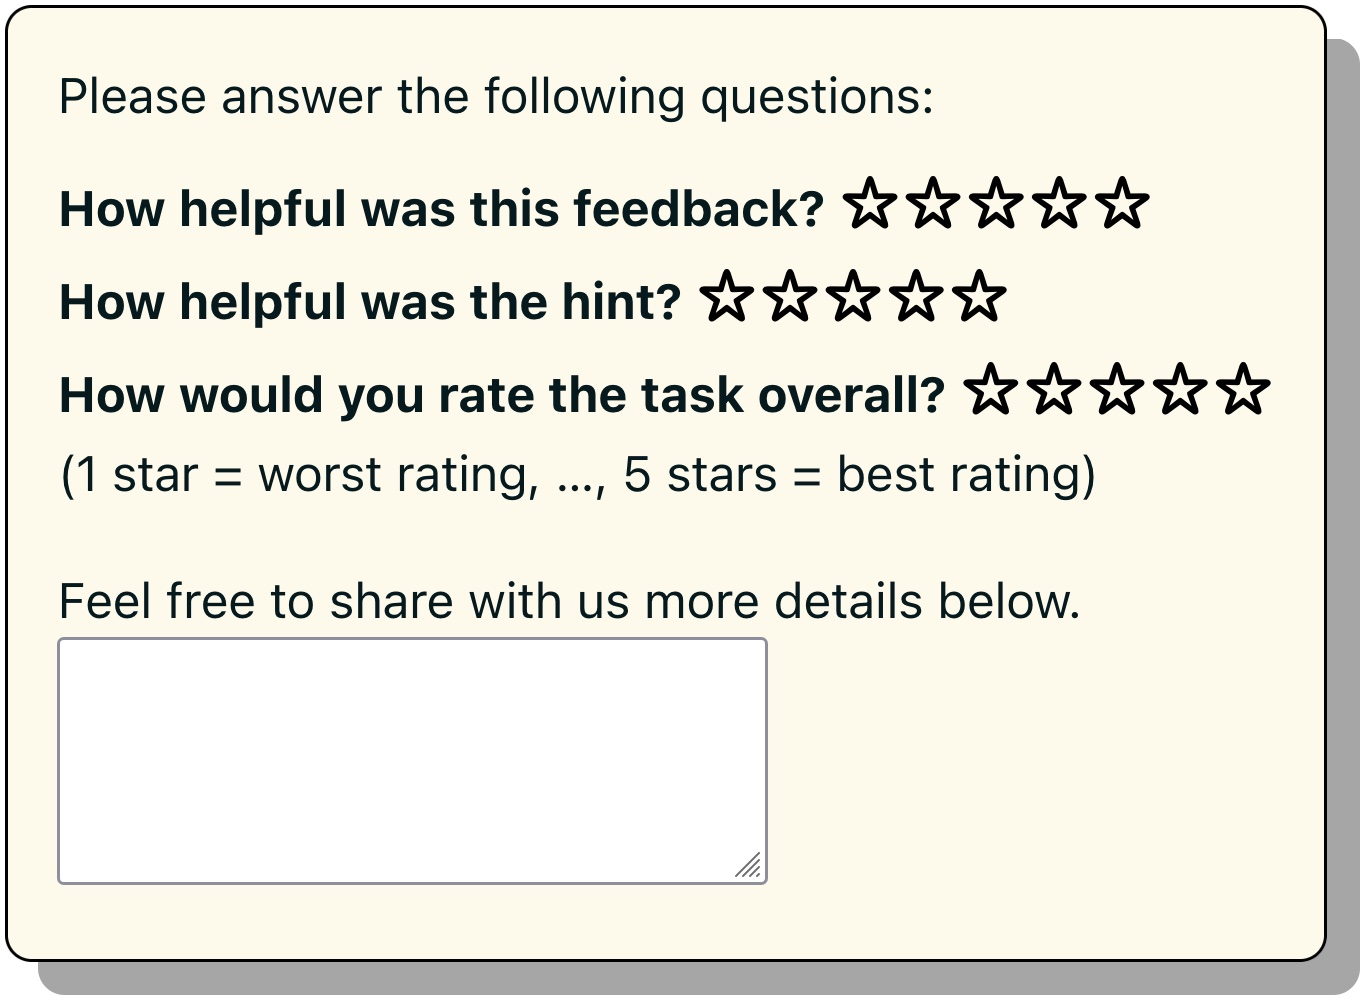
Hide the default legend and add a custom one
If you add the no-legend class to the
<div> with the stars-rating class, the
default legend (“1 star = worst rating, …, 5 stars = best rating”) will
be hidden. Instead, you can add your own legend. It is recommended to
add the custom legend at the very bottom of the <div>
that has the stars-rating class. If you add the
legend class to the <p> element that
contains your legend, a little margin to the last rating question will
be added. Overall, your custom legend might look like this:
<p class="legend">5 stars = fully agree, ..., 1 star = do not agree at all</p>Changing the language
By default, automatically generated text snippets like the legend and
the success message are in English. To use a different language, the
lang attribute must be changed at the
<div> with the class stars-rating, for
example,
<div class="stars-rating" data-name="my_id" lang="de">
    ...
</div>
where de stands for German.
We currently support de (German), es
(Spanish), fr (French), nl (Dutch),
pt (Portuguese), and English as the default language.
Force students to submit their ratings
As of STACKrate v0.2, by default students do not have to answer all
rating questions in order to submit the rating or the Moodle quiz
attempt. If you want to force the students to submit all ratings (as it
was the default behaviour in STACKrate v0.1), just add the class
force-submission to the <div> element
with class stars-rating, for example:
<div class="stars-rating force-submission" data-name="my_id">
    ...
</div>
If this class is set, at least one star rating question has not been answered, and the “Check” (or “Finish attempt …”) button is clicked, the text “Please submit all ratings” will be displayed. Students will not be able to continue until they have completed the rating. Only when all the rating questions have been answered, the ratings and the question can be submitted by students as usual.
Changing the appearance
To change the appearance of the STACKrate box, the style
attribute can be added to the <div> element with
class stars-rating. This attribute allows to change the CSS
properties of the box. The available options include:
background-color: <colour>sets the background colour of the box, where<colour>is a colour name (e.g.red) or a colour code (e.g.#FF0000). More information about colours can be found at this link.color: <colour>sets the colour of the text inside the box.border: <width> <colour> <border-style>sets the properties of the border of the box.<stroke-width>sets the width of the border (e.g.1px).<border-style>(e.g.dashed) defines wherther the border should be solid or dashed.box-shadow: <definition-of-shadow>: Sets the shadow of the box. The shadow can be disabled by selectingbox-shadow:none. If you want to use a custom shadow, this tool is recommended.
The following example results in a box with a light green background, dark blue text and no shadow (see image below):
<div class="stars-rating" data-name="my_id"
    style="background-color:lightgreen; color:#00008B; box-shadow:none;">
    ...
</div>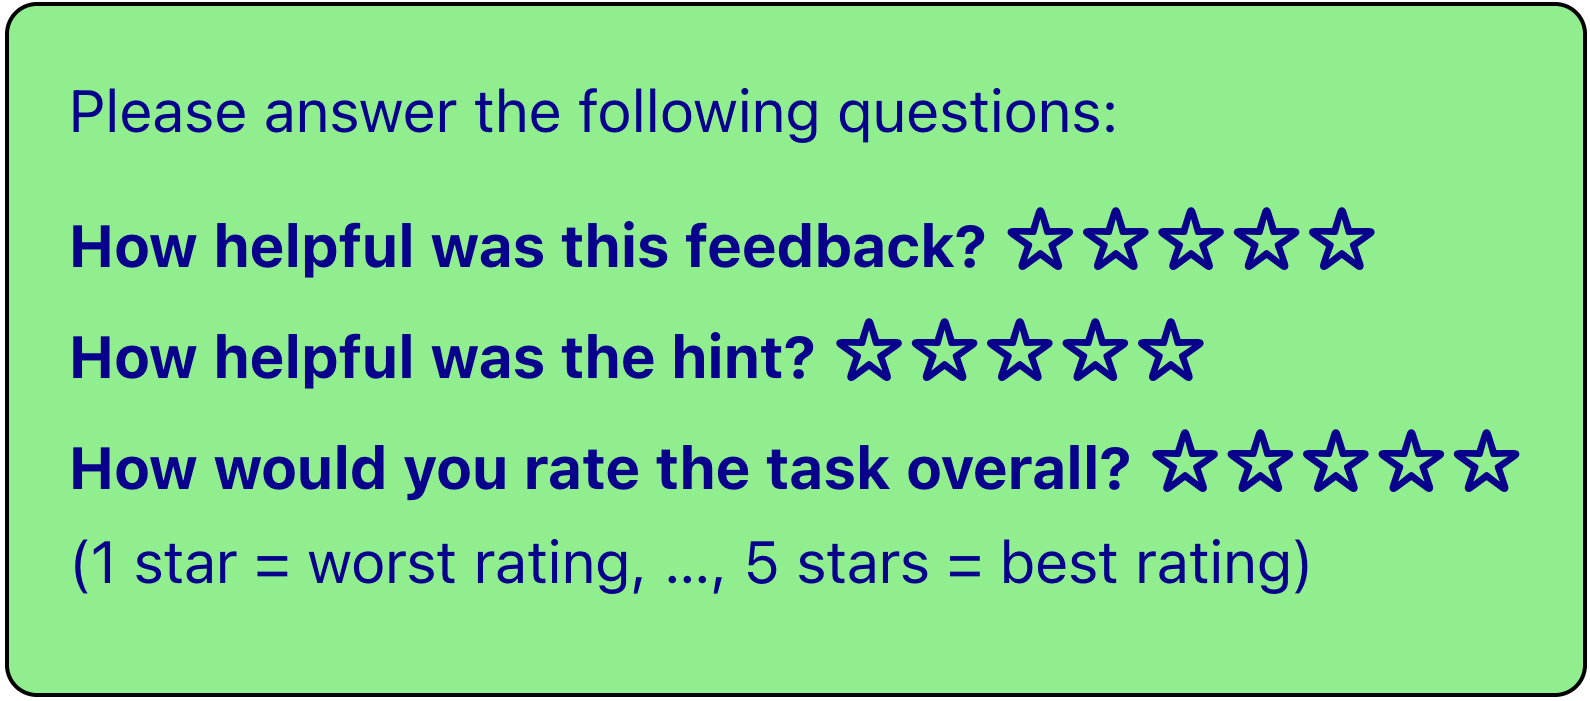
If you want more customization, you might want to set the CSS
properties for the class stars-rating directly, rather than
overwriting them locally with a style attribute. You could do this with
a style element within the question text, or even host a
CSS file somewhere and include it with a link tag. This is
partucularly useful if you have a lot of star ratings you want to look
the same and you do not want to copy and paste all the boilerplate
code.
To change the highlight colour of the stars, simply add the
data-highlight-color:<your-colour> attribute to the
<div> with the stars-rating class, for
example:
<div class="stars-rating" data-name="my_id" data-highlight-color="green">
    ...
</div>
Hovering over the stars will change their colour to green.
Creating multiple sets of star rating questions
If you want to use multiple sets of star ratings in the same STACK
question, simply select different data-name attributes for
each set:
<div class="stars-rating" data-name="my_id_1">
    ...
</div>

<div class="stars-rating" data-name="my_id_2">
    ...
</div>
Using the frontend
When students are presented with a set of star rating questions, they
can select from one to five stars. If no star is selected, the
evaluation question will be considered as rated with 0 stars. Once the
stars have been selected for each rating of a set, the Moodle “Check”
button changes its name to “Submit rating” unless the
data-moodle-integration attribute is set to
false. When the students click “Check” (or “Submit
rating”), the set of star rating questions will disappear and the
success message “Thanks for your rating!” will appear instead.
Please note that as of STACKrate v0.2, students are not by default forced to answer all rating questions (see Force students to submit their ratings).
Getting the results of a rating
How to access the results
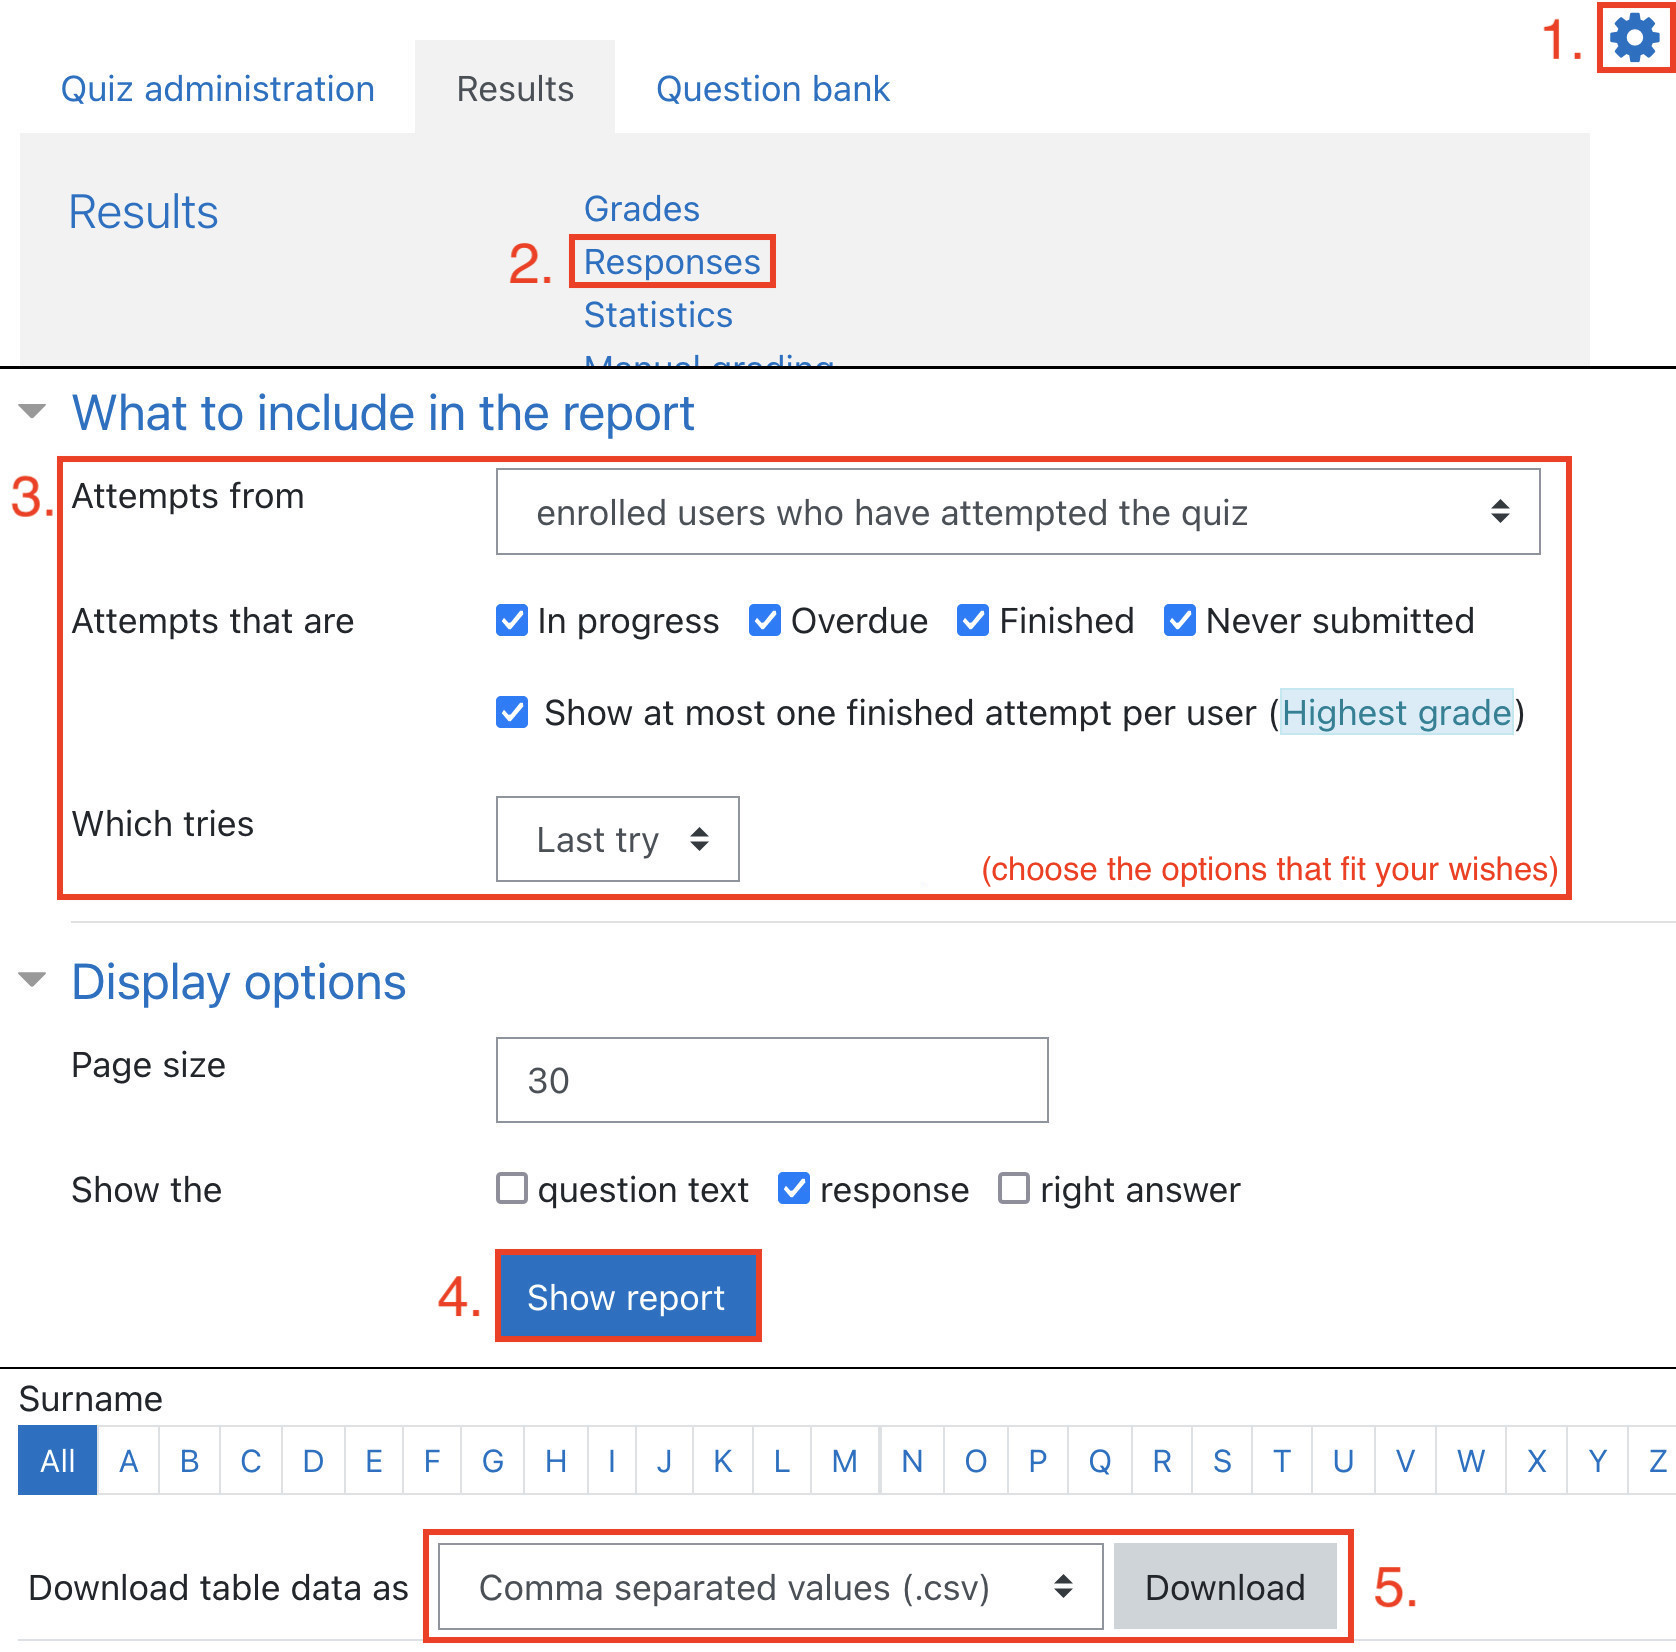
The results of the ratings can be found in the test data for the Moodle quiz. A table of all of students’ responses (including the results of the rating) can be downloaded (Quiz Actions Menu → Results → Responses → Download table data as Comma separated values (.csv)).
It is important that the exported table contains (only) the ratings you are interested in. For example, if you only want to include only the last attempt of each student, select the checkbox “Show at most one finished attempt per user” in the section “What to include in the report” and select “Last try” from the “Which attempts” dropdown list.
How the results are saved
When the students answer the star rating questions, the results are copied into the hidden STACK input field in JSON format. This means that the results will be written in the following format:
{
    my_id_1: {
        "ratings": [3,4,2,...],
        "comment": "Comment inside the text area",
        "submitted": true/false
    },
    my_id_2: {
        ...
    },
    ...
}
Using Python to extract and process the results
STACKrate includes the Python script stars.py which can
be used to extract the results of an evaluation from the CSV file
provided by Moodle. Please note that the script will only work for CSV
files that contain only one STACKrate evaluation.
To run the script, follow these steps:
Install Python 3 on your computer.
Download the script
stars.pyfrom our website or repository.Open the file using a Python launcher. If you are using Windows, you probably just need to double-click on the file. If you are using macOS, you may need to right-click on the file to open it with the “Python Launcher” application.
A file dialogue box will then appear. Select the CSV file that you downloaded from Moodle.
Another file dialogue box will appear. Select the folder and the wished file name for the export file (e.g.
output.csv).
Python has now created two files. The one with the filename you
specified in step 5 (e.g. output.csv) is a table containing
the numbers of stars for each of the evaluation questions and any
comments, for example:
| Question 1 | Question 2 | Comment |
|---|---|---|
| 5 | 4 | |
| 5 | 5 | Good! |
| 1 | 2 | The feedback could be more detailed. |
| … | … | … |
The file with the supplement _stats
(e.g. output_stats.csv) contains some basic statistics
about your evaluation, such as the number of ratings, the average number
of stars given for each evaluation question, and the distribution of the
number of stars given for each evaluation question.